Video Gamer is reader-supported. When you buy through links on our site, we may earn an affiliate commission. Prices subject to change. Learn more
- Get the Ancient Dragon’s Blessing item from the Dragon Priest at the Grand Altar of Dragon Communion.
- Bayle is weak to Bleed, Poison, and Scarlet Rot.
- Head hits do more damage. Be aggressive
- Use Ancient Dragon’s Blessing in phase two.
Ah, Bayle the Dread. What a jerk you are. This boss is entirely optional, so we hope you appreciate that we threw ourselves against this ridiculous boss for the better part of two hours to finally beat it. Bayle is an incredibly large dragon fought in the bottom right of the map and you need to be prepared for a long, infuriating, battle full of moments that are straight-up unfair to deal with. Let’s take a look at how to beat Bayle the Dread in Shadow of the Erdtree, and the best ways to deal with this hell.

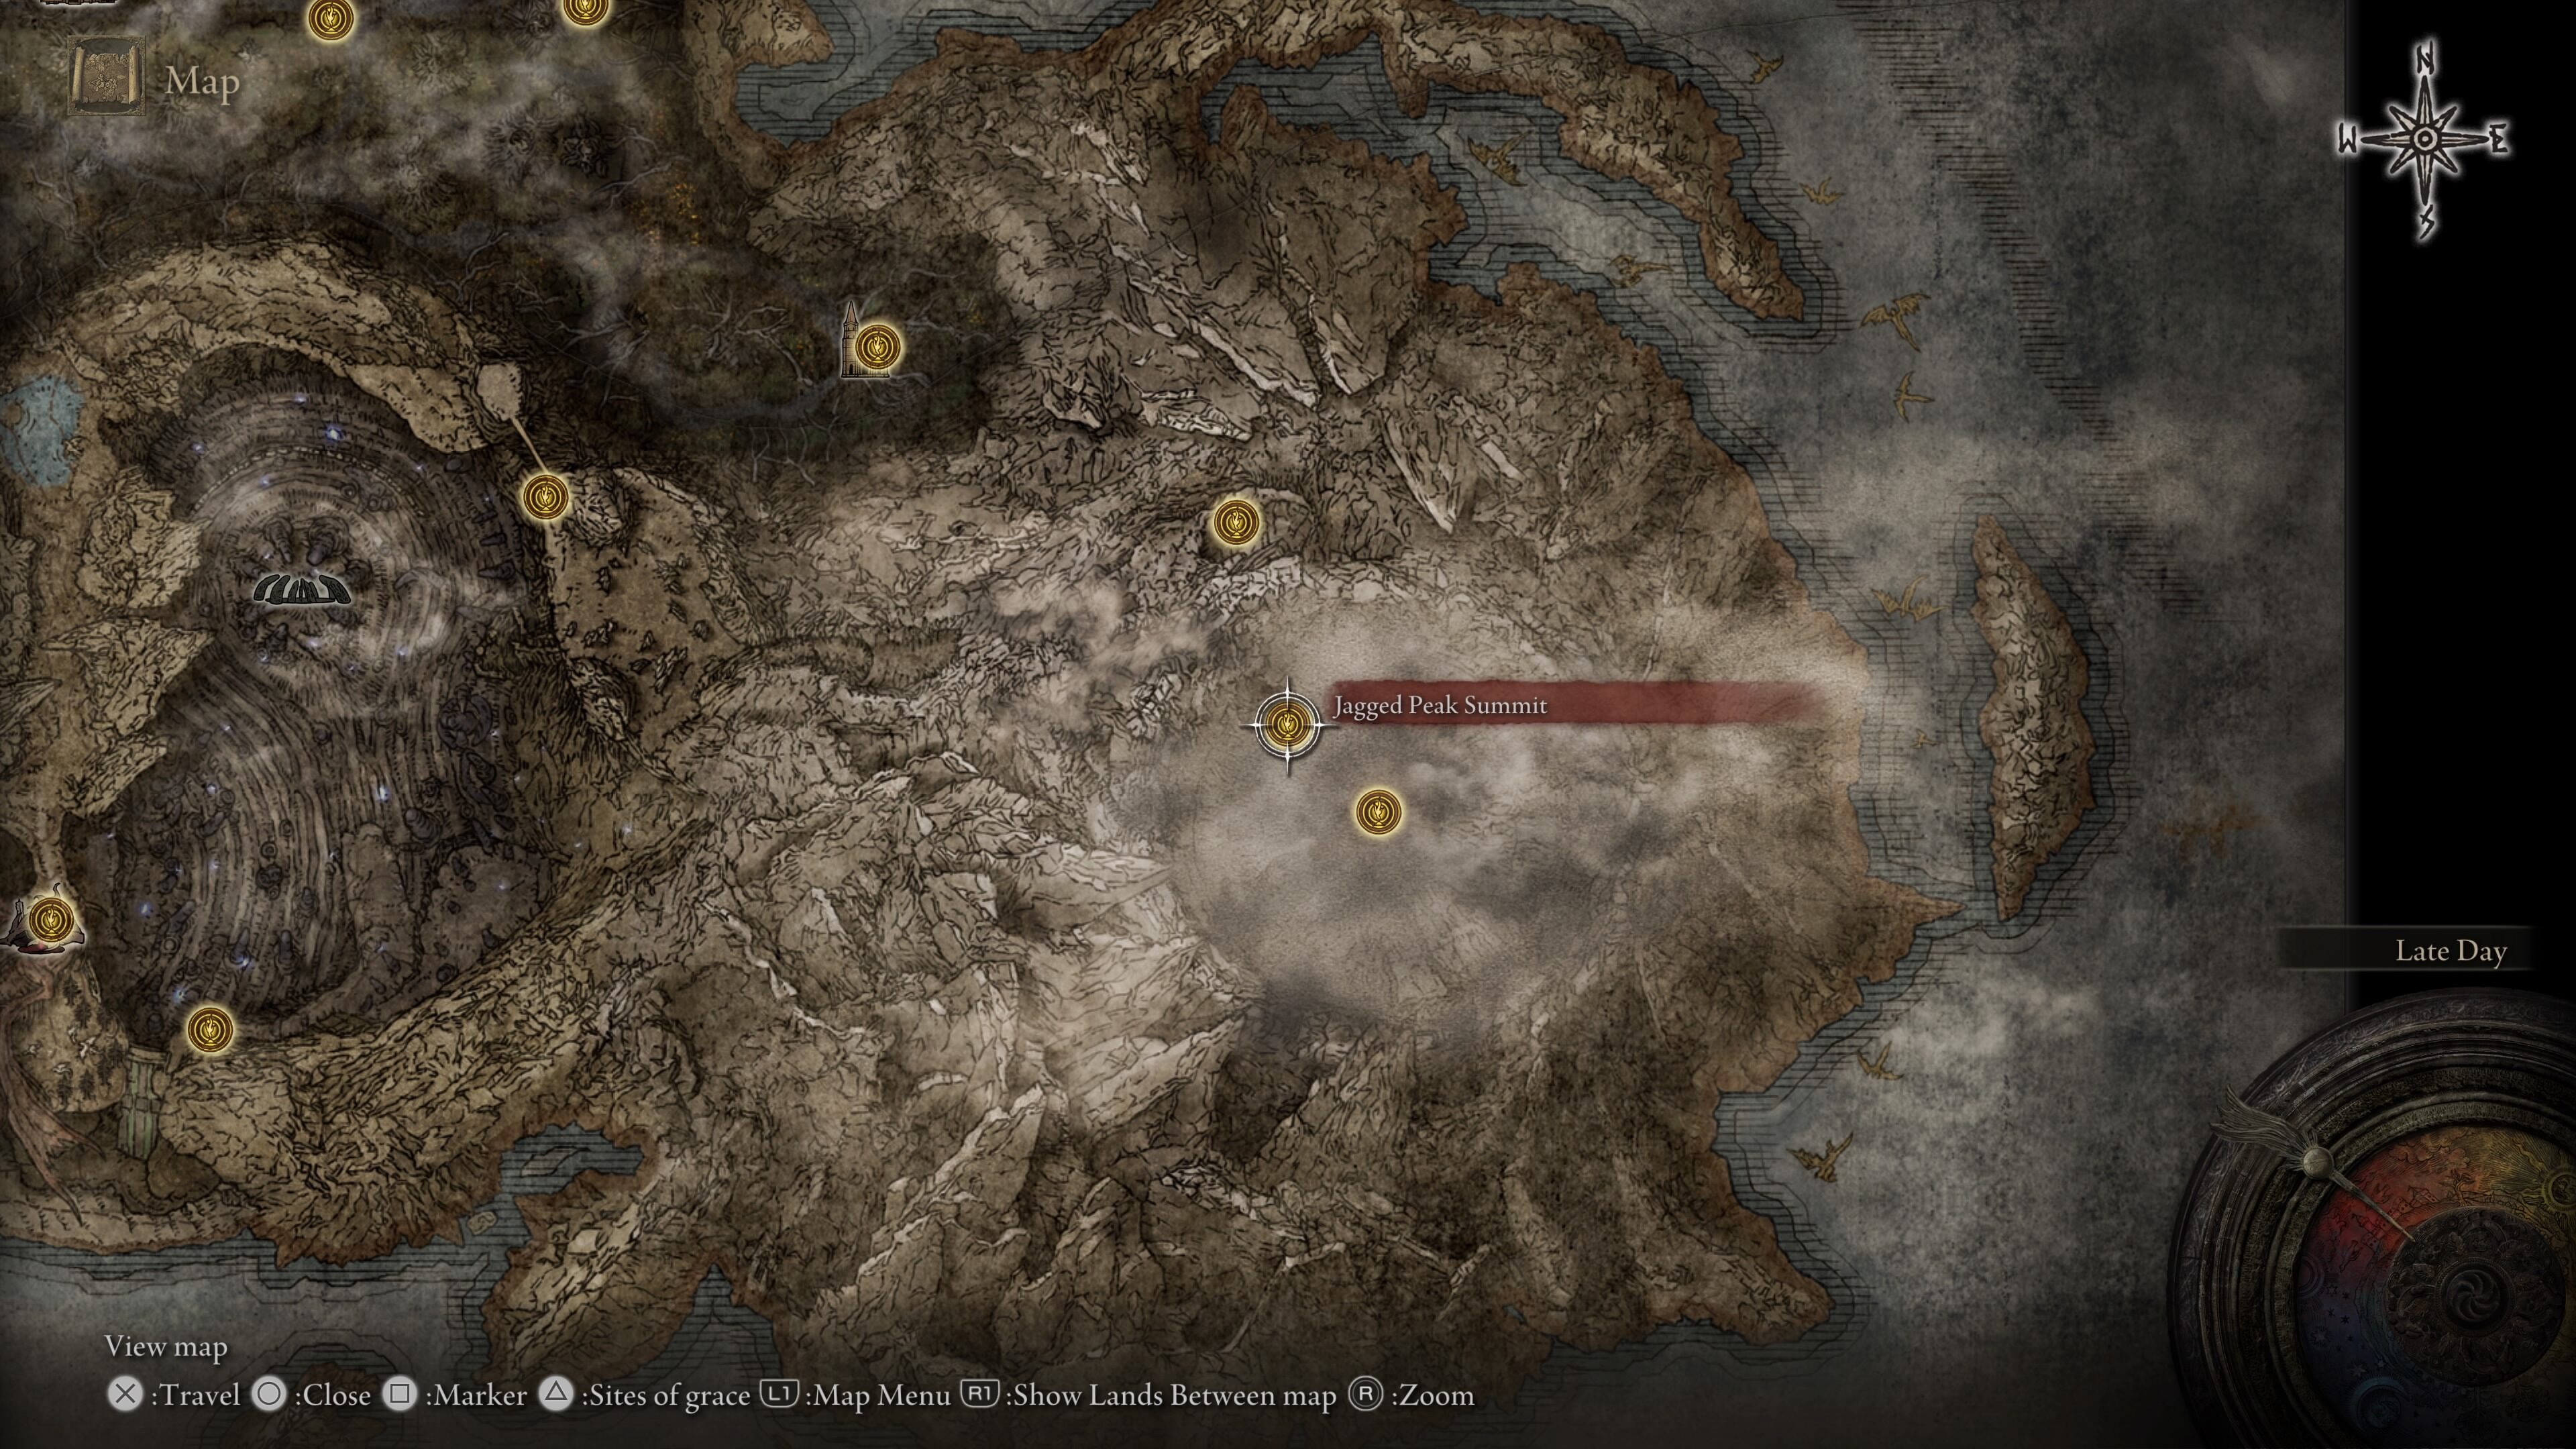
Bayle the Dread location
The bottom right part of the map is extremely linear and it leads to the Jagged Peak. On your way to Bayle, you’ll fight a lot of dragons and eventually find yourself at the Jagged Peak Summit Site of Grace.
Recommended gear and our build
This is it, the final, final boss for good this time. With Radahn dead and buried once more, Bayle will be the final challenge the DLC has for you. The good news for us is that Bayle can be bleed, and, as you all know, if it bleeds we can kill it. Bayle might not crumble like a leaf the same way other bosses do to Rivers of Blood, by darn it all if we don’t stubbornly love this weapon above all others.
- Level 209.
- Rivers of Blood +10, Banished Knight’s Shield (no Skill)
- Verdigris Helm, Beast Champion Armor, Gaius’s Gauntlets, Oathseeker Knight Greaves.
- Shard of Alexander, Lord of Blood’s Exultation, Erdtree’s Favor +2, Crimson Seed Talisman +1.
- Godrick’s Great Rune (Activated)
- Ancient Dragon’s Blessing (Consumable)
- Mimic Tear +10.
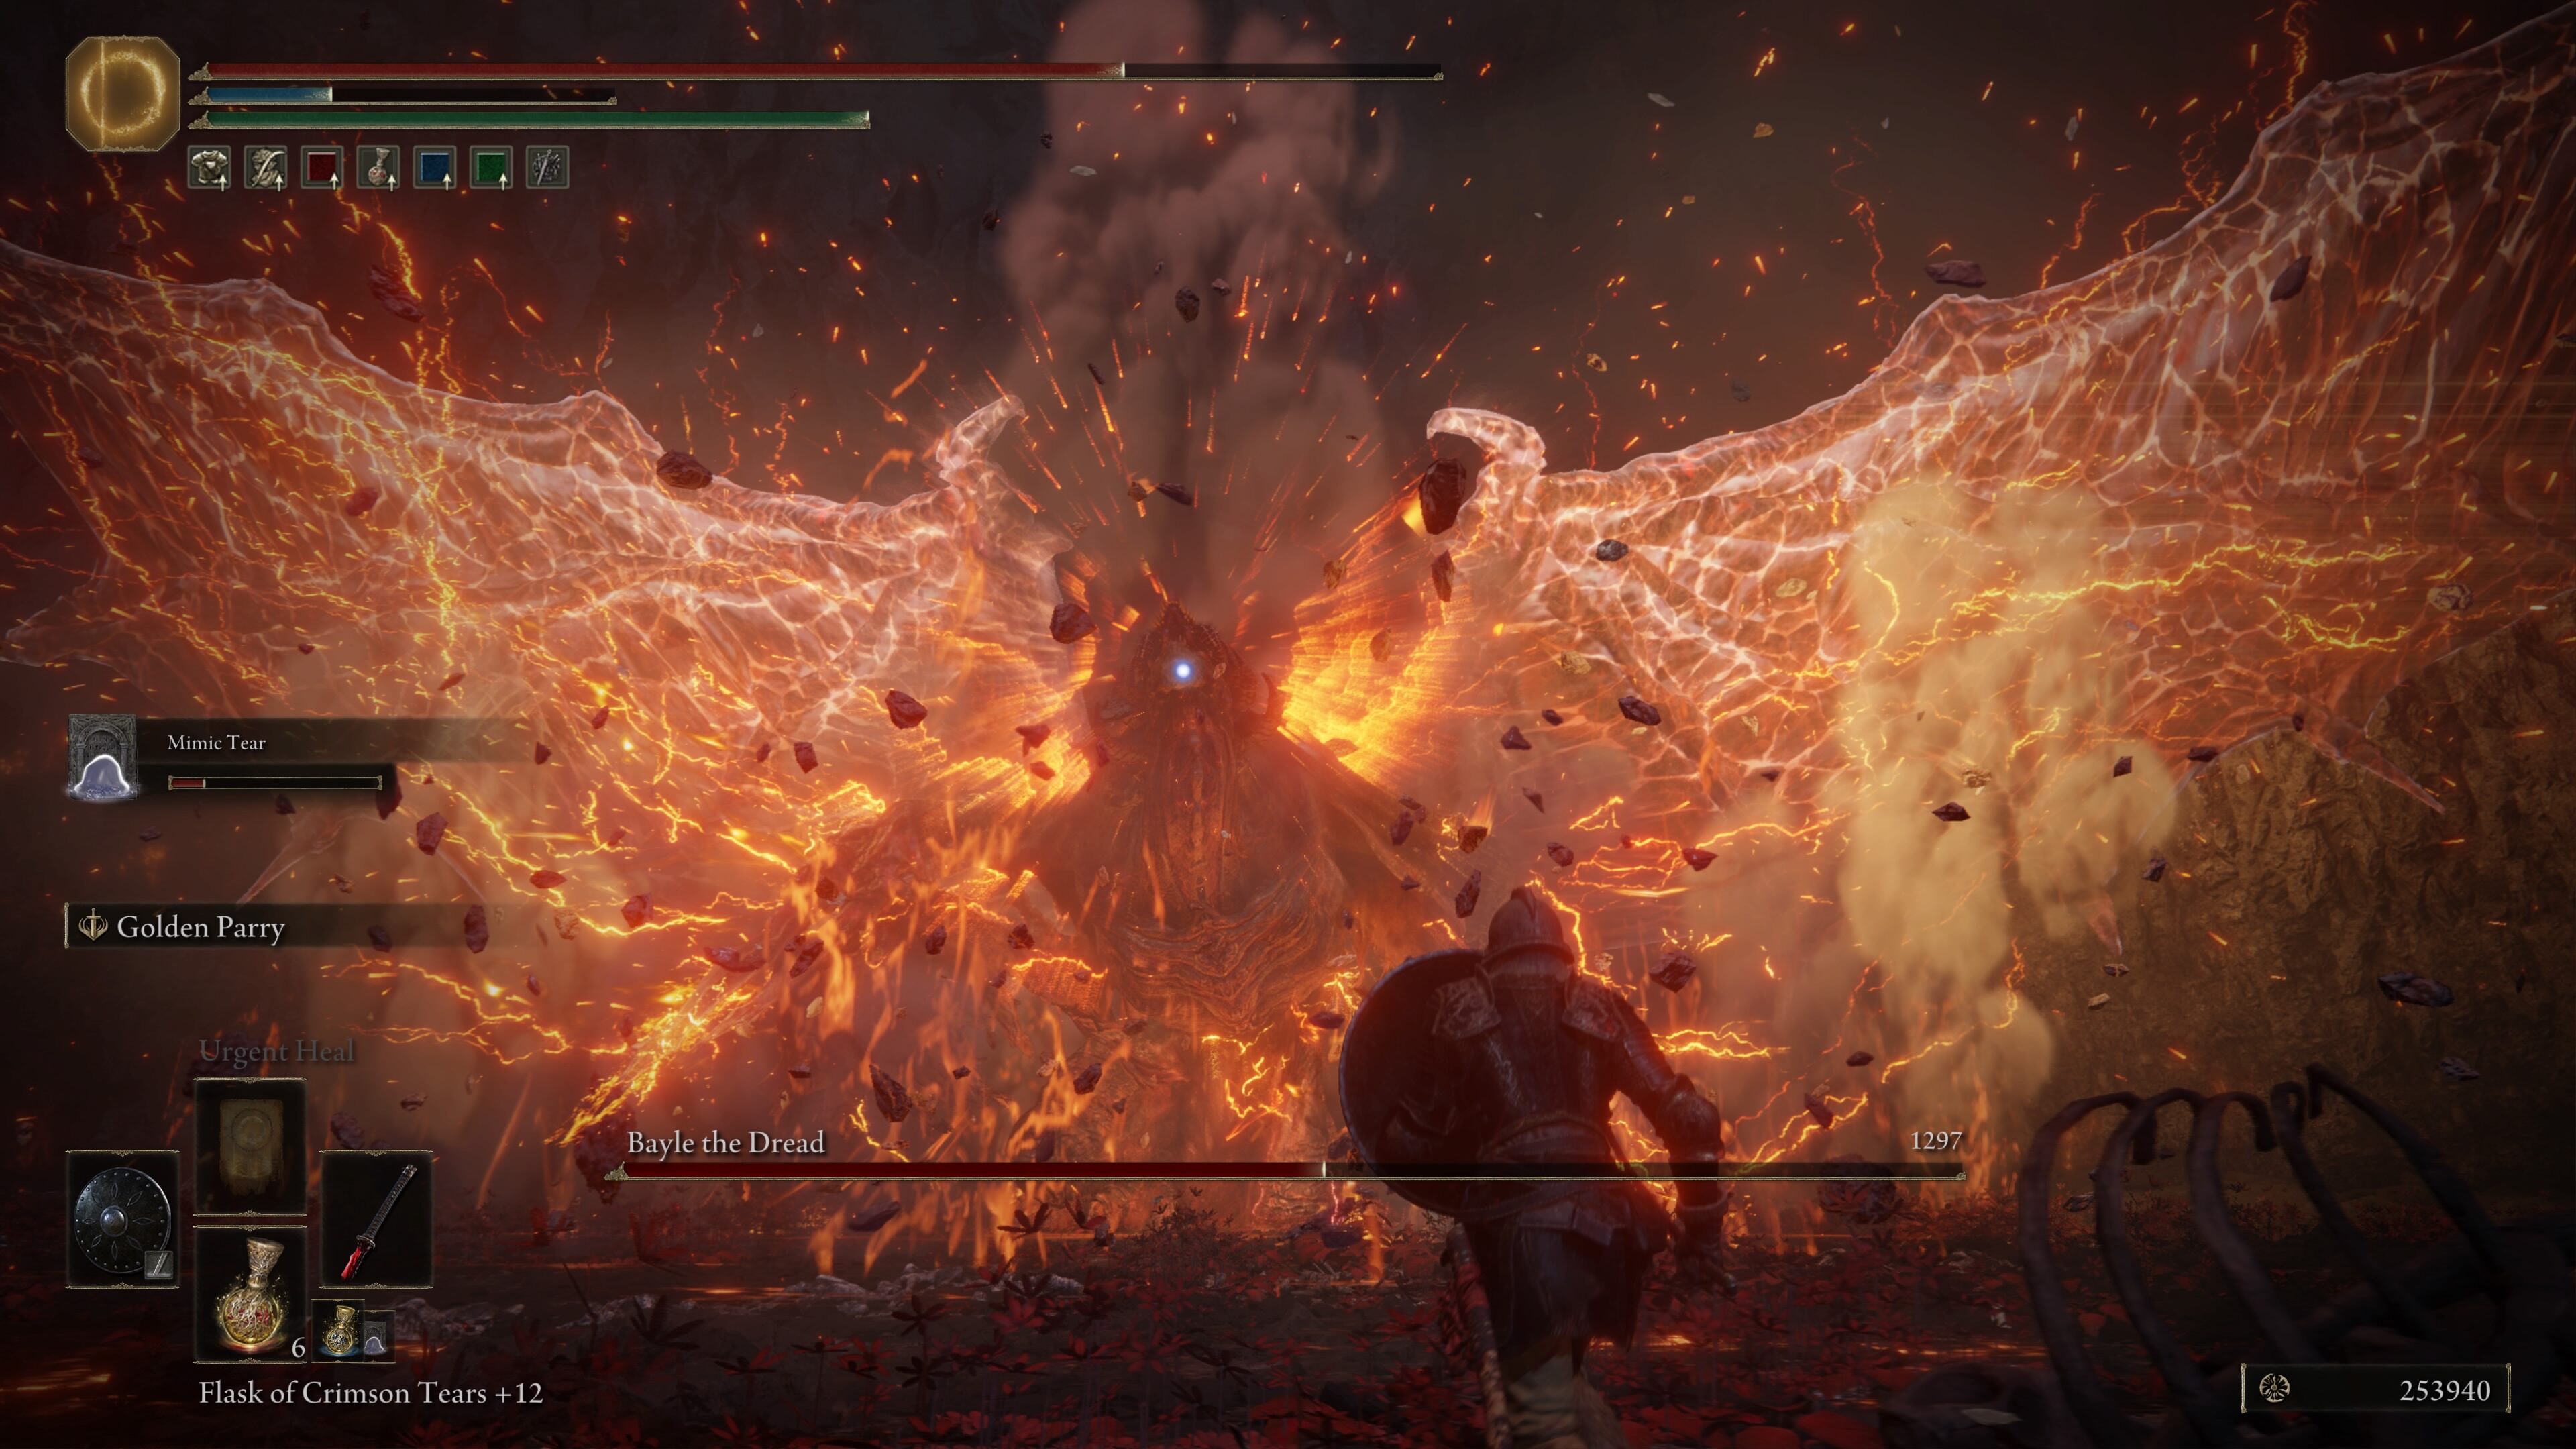
Before you fight this boss, you must talk to the Dragon Priest at the Grand Altar of Dragon Communion to get a special consumable item for this fight called the Ancient Dragon’s Blessing. This will dramatically increase your damage negation and resistance by a lot. It will last for roughly one minute and we highly recommend you use this in Bayle’s second phase. Once you use it, you can get another from the Dragon Priest as many times as you like. For your reference, here are our stats when we beat Bayle. Thanks again, Mimic Tear. You’re the real hero.

Bayle the Dread boss guide
When the fight begins, watch to see what Bayle does. You want to be reactionary in this fight more than anything. If all he does is slowly walk towards you, summon your Mimic Tear and heal immediately. If Bayle attacks with flames, wait for it to get close and roll through it. After you dodge the first blow, summon your Spirit Ash and prepare for the next attack.
Bayle can also open with a lunging jump attack. This is the worst thing for you. If he jumps at you, wait for him to almost be on you and then roll forward to the right. Back up and take this time to summon your Spirit Ash.
You’ll notice pretty quickly that not only does Bayle have disgustingly high HP, but Bayle also has obscenely high defence rates. Attacking his legs or wings won’t do a lot of damage at all, but they can help you build up statuses like Bleed or Poison. Really, you want to try and aim for the head; he takes considerably more damage from head hits, so keep this in mind when attacking.

Bayle likes to keep you away. Get closer. Image taken by VideoGamer

Rivers of Blood is great for hitting the head. Image taken by VideoGamer

Bayle has a lot of AoE things to dodge. You need to pay attention. Image taken by VideoGamer

Bayle’s head will be vulnerable for a few hit. Pick your moment. Image taken by VideoGamer

This attack is a pain. Roll to the right to avoid the fireballs. Image taken by VideoGamer
Stay as close as you can to Bayle and hack at his feet if you can’t reach his head. This is where a Bleed weapon will come in clutch for you because Bleed will always build up with every hit from the Rivers of Blood. Corpse Piler helps you push through for more damage, which is why we specifically recommend using a shield that has no skill on it to get instant access to the Rivers of Blood Skill. You’ll notice Bayle likes to move around a lot, but you must be hyper-aggressive to keep up with him.
For us, we had plenty of runs where we couldn’t land a hit for a solid 40 seconds or so. It can be like that, but you can’t let that get to you. In Elden Ring, especially in the DLC, sometimes you’re the bug and sometimes you’re the windshield.
Sadly, you can’t spend the whole time by Bayle’s feet. You will need to watch out for a lot of attacks in such close range, especially because Bayle has an extremely unforgiving hitbox. It is unfair, we’re not afraid to say, because an attack from Bayle using his head should not result in us being hurt by his knee.
When in close range, you need to watch out for a frontal breath attack. There is a trick with this attack in that you can easily avoid it if you just run away. The flames spread our first, and while they will wash over you, these won’t hurt you. The thing that will hit you and cause damage is the small electric sparks in the fire that spread out after it. Run away to avoid it. Don’t try and roll forward because you can get hit multiple times, even when on the ground. Move back in after for some damage.
The next attack to watch out for is when it lunges overhead with its wing. It will bring the wing down and cause a large explosion. The timing of this attack is deceptive, but you must roll at the last moment. Watch for the wing coming down above you and roll later than you might think. After dodging this, keep attacking his leg or reposition to hit his head to get in some decent hits.

Bayle will try and create distance so he can exploit his ridiculous fire breath attacks. He has two. One will unashamedly input-read the direction you’re running while the other one is more easy to dodge. When you see Bayle spray fire towards you in a wave, roll through it just before it reaches you. When you see Bayle sit still and charge up a breath attack, run full pelt in one direction and then change direction at the very last moment you see Bayle move forward to launch the fire. This will screw with Bayle’s input reading and let you avoid the breath. Rolling it is awkward because of the large, lingering hitbox.
Just keep getting closer to Bayle to shut down these ranged breath attacks. If you can, try and bait the wing lunge combo, that he follows up with a bite attack. This will leave his head vulnerable for free damage.
While in mid-range, Bayle can use a lunging grab attack. This is well telegraphed; Bayle’s mouth will glow with electricity and fire and he will follow your movements for a few seconds. He will then lunge forward and try to snap you up. If you roll to the side, you can get in an easy combo after he misses. Hit the head, as it is presented to you.
When Bayle leaps away from you, don’t immediately chase after him. He will still have his back to you and it is because he is about to perform a spinning swipe with his tail to catch you out and stop you running after him. When you see him jump away from you, take the time to heal if you need it and wait for the tail swing to dodge over it. This is another attack that lets you get to Bayle’s head and deal some serious damage while he holds the stance. The range on the attack is huge and Bayle will almost return to the position he was in before jumping away.
We had a lot of luck exploiting his attacks while staying close to his left leg, specifically under his belly and by the knee. While you have to contend with janky hitboxes from his body and above, you can keep rolling forward to stay safe a lot of the time. Keep attacking and if you get hit, try and recover with a quick heal, then go back in for more damage if he hasn’t run away.
If you need more damage in this first phase, it’s important to know you can poison him. It took about 30 poison darts for us to get this. Scarlet Rot was easier. Something to keep in mind for this fight.
The more time you spend in this first phase, the more familiar you’ll get with his attack patterns. His jump slam is a good one to exploit, as is the wing combo where he digs his wing into the floor and it crackles with electricity. Hit the wing for some easy damage and keep closing the distance when necessary.
After a lot of back and forth, (and in our case, some help from Bleed triggering), you will eventually get Bayle down to half health. Do you know what this means? Yes, it’s time for a Sailor Moon transformation sequence. Nah, not quite – but Bayle will take this moment to power up and, predictably, enter a second phase. Before he does this, he will power up and ready a huge attack combo.
Bayle the Dread – second phase
Now, while Bayle is powering up, we highly, highly recommend you take this time to get in his face and deal as much damage as you can. The ground is about to explode with his attack, but hurting him during this attack is extremely worth the risk, in our opinion. Make sure you have enough HP to survive being hit and get close for some damage. Bayle will cause explosions on the ground and take to the skies. He will fly up and travel in a circle blasting fireballs at you.
Keep locked on to Bayle and simply strafe to the right and roll to dodge each one. When the final ball comes in, Bayle will now fly in and come crashing into the arena, hitting pretty much everything. Everything, that is, except you, if you roll to the left when you see him approaching. It’s crucial you roll to the left. Going any other way will result in you being hit. Sometimes you can get caught on his leg and take a hit.
Now that Bayle has landed and you (hopefully) survived, you will have more fun to deal with. A lot of attacks will have extra lightning appear after them and he will create spots on the ground that will blast you if you linger there.
If Bayle lands far away from you, get closer as soon as you can. This is where you might experience his input-reading breath attack. Remember to change direction when you see him use it, to hopefully get to safety. At mid-range, he will use the same glowing wing attack, but it will have more splash damage now with lightning spawning under you and around the boss. The timing has to be perfect, but you can roll forward and slightly to the left into the wing attack and then move forward to get in some damage.
When you’re close, you need to be careful about getting caught on his legs and stomach. Even his overhead attacks will hurt you if you’re there. There isn’t a lot you can do if you happen to get stuck there. If you get hit, try and roll away and heal. If you die, well, unfortunately, that’s just how it went this time. If you see him performing a multihit combo towards you, using his wing and swiping, don’t be afraid to roll backwards if you’re far away enough.

It’s around this time, when Bayle has just less than half his HP, that you should use the Ancient Dragon’s Blessing. You need a tiny amount of FP for it, so save some or top up your FP before. This will give you increased damage negation at the most desperate time in the fight. The number of times we got killed by Bayle’s knee is in double digits, but try not to get discouraged. This blessing will help you stave off unwanted deaths for a brief window; it’s that powerful.
Even in close range, you have to be on your dodges and know when you can heal. When you see an opening, decide at that moment if you should use the window to heal or to go for more damage. For example, you can heal when he flies into the air to his big flame attacks.
As always, the Mimic Tear using the Rivers of Blood is a force to be reckoned with. Having so much bleed build-up on the boss is extremely helpful and helps you take massive chunks off the boss. You will be forced to take risks in this fight and be more aggressive than you would ever want to be. This is to ensure you don’t let Bayle outrange you and keep you at bay with fire attacks.
When you see Bayle fly into the sky, he is going to perform an extremely powerful breath attack. He will charge up the breath and blast the floor in front of you first. You can jump over this, but your timing needs to be perfect. Likewise, you can roll through the attack. After that, he will fly in front of you and then charge up another breath attack that will come directly at you in a line. The flames from this don’t hurt you, it’s the electricity that will get you. Roll to the left twice to avoid the breath and the explosion caused after. Always roll twice with this one. When he lands, heal up and close the distance to go for a head hit.
When we had him at a quarter HP left, we had no healing and it was do or die. Bayle was not letting up one bit and we had to push through for the damage. Rivers of Blood’s Skill was amazing at hitting his head here and it eventually got us the win. We used our Marika’s Blessing full heal to stay in the fight, but that was the last desperate heal.

We searched high and low for a way to cheese this guy. We tried everything, looking for the hot new Spirit Ash to make a mockery of Bayle, to no avail. In the end, we got through using the Mimic Tear and the Ancient Dragon’s Blessing consumable. We tried Leda’s Sword, Ansbach’s sweet scythe, but nothing brought us close to victory. In the end, it was beauty that killed the beast—rather, the Rivers of Blood.
That’s it. We hope this is enough information for nailing the Bayle fight. You have to pick when you are aggressive and push through when you think you should back off. Sometimes, the RNG just isn’t on your side. Come back later and try again, if you start getting frustrated with the fight, you won’t get anywhere. The fight takes patience and it is not a race.
Bayle the Dread move list
Bayle’s attacks are as plentiful as they are annoying and devastating. There are a lot of variations of the same attack and he has some rare moves that you might be lucky enough not to see. Here are all of Bayle’s attacks and what you can do about it.
| Attack | Description | Strategy |
|---|---|---|
| Frontal Flame Spray | Bayle spreads fire from left to right. He can use this as soon as the fight begins, so be ready for it. | Move towards the flame and roll through it at the last second. Take this time to summon your Spirit Ash if you didn’t get the chance when you entered. |
| Frontal Flame Breath | This flame breath will travel in a line towards you. Bayle can move it slightly after he uses it. | Dodging this attack is super unreliable. Moving to the side is always your best bet, but the hitbox is far too large it mostly always catches you. |
| Explosive Wing Slam | Bayle will use his left wing to slam into the floor. It will glow beforehand and cause an AoE on impact. | When Bayle uses this, roll toward him and slightly to the left. When you evade it, take the time to punish and get in some damage while he’s vulnerable. |
| Tail Swipe | Bayle will jump away and then turn the attack into a huge tail swipe. | Don’t follow after Bayle, his tail swipe will propel him forward and catch you if you run after him. Dodge forward over the tail and home in on his head for some free damage. |
| Diving Slam | Bayle jumps into the air and comes crashing down, causing an AoE explosion. | The timing of dodging this is annoying. Bayle will float for a while in the sky to throw you off. You should dodge when you see his legs come into view above you. |
| Grab | Bayle’s mouth with crackle with lightning and he will watch you for a few moments. He will lunge for you and grab you for a combo. | Watch Bayle and only dodge to the left or right when he’s super close to you. If you dodge it, punish his vulnerable state for free damage on his head. |
| Lunging Wing Stab | Bayle will close the distance with a long-ranged wing stab. He will cover a lot of distance. | Roll forward into the attack, but time it when he’s very close. The hit will leave him there for a while, letting you hit him in the head easily. |
| Downward Fire Breath | After a combo, Bayle will rear up and breathe fire directly down in the area in front of him. | You should run away as soon as you see it coming. The flames from this attack won’t hurt you, but the lightning inside the flames that come out after will hurt you and can hit you multiple times. |
| AoE Ground Explosion | Bayle will power up at half HP, staying still and creating pools of fire on the floor. | As Bayle does this, take the time to attack him. You will get hit by the floor explosion, but it is worth it to get damage in. He will fly away after this, so heal as he does. |
| Fireballs | When Bayle flies into the sky after using his ground explosion attack, he will launch fireballs at you as he flies around the arena. | Keep locked on to Bayle and roll to the right. Always roll to the right to avoid these. If you get hit by one, get up and keep rolling. |
| Flying Flame Breath Combo | Bayle will launch into the sky and perform two fire blasts. These moves have huge animations and you can’t miss them. | First, Bayle will breath fire away from you in a line. This will spread forward but you can jump over it with the right timing. If you can’t jump it, roll forward. Afterwards, Bayle will launch another attack straight at you. Roll to the side twice to avoid this one. When he lands, heal up and try to hit the head. |
| Wing Swipe Combo | If you are in front of Bayle, he can perform a multi-hit combo. He will do a little roar first to indicate this attack. | If you are far away enough, just roll backwards to avoid the attack. Being close while he does this is almost guaranteed to kill you due to the large hitbox and lingering lightning damage. |
| Lightning Blast | A rare attack where Bayle will stay still land call down lightning strikes on your position. | You will see the floor glow to show the move is coming. If it targets your Spirit Ash, take this opportunity to lay into the boss for a lot of free damage. |
| Ground Slam AoE | While powered up, Bayle can do a wing slam where he charges it up and then it detonates the floor in a huge AoE. | After Bayle’s wing hits the floor, the ground will start to swell and it will detonate a moment later. We didn’t get to test this, but we expect you can jump over this explosion. Otherwise, the only way to evade is by backing off or rolling forward at the right moment. |
Bayle the Dread rewards
For beating Bayle you’ll get the Heart of Bayle and 490,000 Runes. Take the Heart of Bayle to the Grand Altar of Dragon Communion to transform it into an Incantation. Likewise, if you visit where you found the Dragon Priest, you’ll also get the Priestess Heart item which essentially functions like the Dragon Torso Stone in Dark Souls. You can take on a dragon form and it will last until you die.
That’s it, you’ve beaten the toughest boss in Elden Ring Shadow of the Erdtree. Truly, congratulations are in order. Maybe now you’ll be strong enough to beat the Blackgaol Knight. Maybe…
About the Author


Elden Ring: Shadow of the Erdtree
- Release Date: June 21, 2024
- Platform(s): PC, PlayStation 4, PlayStation 5, Xbox One, Xbox Series S/X
- Genre(s): Action, RPG